Ready for a programmatic adventure? Well, you've come to the right place. This Journey Canvas Quickstart guide shows you how to design, build, and launch a campaign with one of the most innovative tools in the industry.
Our cutting-edge campaign builder helps marketers plan, buy, and review results on a single platform. Drag and drop creatives and audiences to plan the consumer journey on any digital channel. Target the right message to the right audience and get better returns on ad spend. It's advertising automation like you've never seen before.
- BTW, if you've already read through the Classic Canvas Quickstart guide, some of what you experience here will be familiar.
To keep things simple, I'm writing this guide as if you were new to the illumin platform and don't know much, if anything, about Journey Canvas. That way, you'll be ready to create your own campaigns by the end of the guide.
Take a 60-second tour?
Click the image below to open a workflow tour. See all the buttons and forms you need to build a journey.
Scope
This guide works with a demo use case on Journey Canvas with three funnel stages:
- Awareness: promote understanding
- Engagement: find engaged users
- Conversion: users complete a desired action like a purchase, sign up, or download
As you move through the steps, you'll get keyboard training in campaign-building essentials and learn how to:
- upload creatives
- create an audience
- set up pixel mapping
- configure campaign settings
- create a conversion goal
- add steps to a path
- create a ready-to-publish campaign
Although you won't publish a demo campaign, I'll show you how to find reporting tools to understand and evaluate campaign data.
Contents
Click a link to jump to a section in this article.
- Creating an org structure
- Using the Library
- Laying the groundwork
- Building a campaign
- Publishing and reporting
Creating an org structure
Your first task is to create an agency and an advertiser. These tasks might have been completed for you during your illumin onboarding. If so, feel free to skip this step.
Every campaign sits inside an advertiser, which is nested inside an agency. All your assets (i.e. creatives, audiences, and trackers) are stored in the library and organized inside campaigns. Click to learn more about agencies and advertisers.
Using the Library
The Library stores your audiences, creatives, and trackers. These digital assets are organized by advertiser. Before you upload or create platform assets, check the menu at the top of the page and confirm the advertiser destination folder (if applicable) is correct. If not, click the drop-down field and select the correct advertiser destination.
Creating an audience
The illumin platform has heaps of audience options.
For this guide, I'll show you one option: create an audience by selecting third-party segments from the Marketplace.
Start by opening the Marketplace window.
- Go to the top menu bar and click Library > Audiences.
- Click the New Audience button. A new window displays.
- Select Marketplace.
- Click Next.
Go to the search field and enter a keyword related to the type of audience you want to target with this campaign. In this demo, I want to target families, so I enter family fun.
- BTW, the number in the Members column refers to devices, not people.
Below, I show you how to use filters (an optional but helpful step) to find Active segments. Selecting an audience with an Active status saves time because that audience data is already sitting on the illumin platform, which means you can quickly load it into a campaign and go live. Some segments have a Requires processing tag. These segments require time to download.
- Click the Filters icon.
- Go to the Status field and select Active.
- Click Apply.
- Scan the list and use checkboxes to select one or more segments. illumin adds each segment to the library.
Go to the bottom right corner and click the Add to New Library Folder button. This is an optional but recommended step because folders simplify file management. In the pop-up, enter a unique folder name and click Create. illumin adds the folder and audience to the Library > Audiences page associated with the advertiser.
Uploading a creative
To keep things simple, upload a single image file. (FYI, bulk uploads are possible. I discuss that feature in a different article.) Later, you'll drop that creative into a step when you create a path on the canvas.
- At some point, you'll want to learn these ad tech industry creative options and file specs.
To upload an image file:
- Go to the top right corner of the page and click Library > Creatives.
- Click the Add Creative button.
- Select Single Upload.
- In the slider panel, select Display > Hosted > Standard.
- Click the Select file button and upload a file from your device. A new form displays.
- Click the folder field and select New Folder (optional but recommended).
- In the new field, enter a unique, descriptive name.
- Go to the Click URL field and paste in the website page URL (with or without UTM code) that should display when users view the impression and click (or tap) this image.
- Ignore the other fields for now. They're optional.
- Scroll down and click Add.
illumin adds a row to the Creatives table. Go to the Creatives table and expand the folder. To review or edit file settings, go to the row and click the pencil icon. In the screenshot below, the table shows two uploaded images (inside the Int'l Media folder) and one video (inside the Int'l video folder).
Mapping a tracker
In programmatic advertising, a tracker is a piece of code placed on a webpage, landing page, or inside an ad. When someone visits the page or takes a specific action, the pixel fires and sends data back to illumin. This allows marketers to track key events, like ad impressions, clicks, page views, or conversions, such as purchases or sign-ups.
Trackers are essential for measuring campaign performance, attributing results, and optimizing future ad delivery. They enable advertisers to see what's working, retarget users who didn't convert, and build audience segments based on user behavior. For example, if someone buys a product, the tracker on the Thank You page records the sale. That data can help marketers understand which ads drove results and how to improve targeting.
Managing tracks on the illumin is intuitive, but requires a bit of back-end technical skill for deployment. I suggest you read this article to get a primer and this article to learn how to manage trackers on Journey Canvas.
Laying the groundwork
You made it this far! Congrats. The heavy lifting is done. Now, we'll open Journey Canvas and start the building process. Click the Journeys link in the top menu bar and then click the New Journey button. In the pop-up, select Journey Canvas and click Start. The wizard displays.
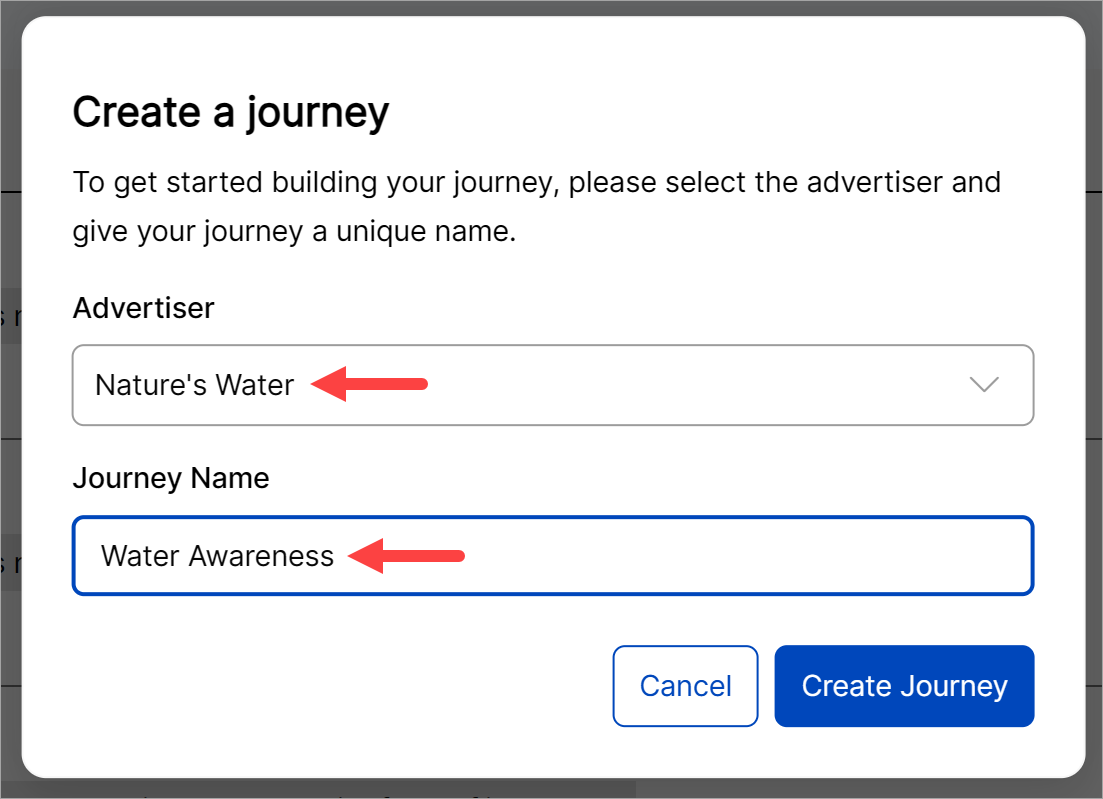
On the General Settings & Billing form, click the Advertiser field and select an advertiser. Enter a journey name (usually a brand). Click Create Journey.
On the next screen, select the stages you want to build on the canvas. Select one, some, or all three stages. In this demo, I select all three stages and click Confirm stages.
The Journey Canvas displays. Go to the top of the canvas, and you might see three small titles. These titles show the name of each journey stage. If you squint, you'll see dividing lines. Those stage lines create vertical sections on the canvas once you start building a funnel.
Adjusting the zoom level
If canvas elements are too small, zoom in. Go to the bottom right corner of the canvas and click the plus (+) button to zoom in. Sometimes, the zoom tool moves paths way off to the side. Click and drag canvas elements to a convenient location, like the center of the screen.
Opening the settings panel
Now, it's time to enter the data that the illumin algorithm needs to power the campaign. Go to the menu bar near the top of the page and click the gear icon. You might notice it has a red dot. The Journey Settings panel displays.
The Journey Settings panel displays six sections. Spend a few minutes reading each section and filling in the required fields. I show you how in this article.
Adding a path
With your Journey Settings configured, go to the left-hand side menu and drag a path to a stage on the canvas. In this demo, I drag the Open Web tile to the Awareness stage.
A pop-up displays and asks if you want to enable cross device. This is a useful tool if the stage goal is related to conversions. Since I'm building an awareness campaign on this stage, I'll ignore the option and click Continue. Click here to learn about this feature.
Building a campaign
Your work begins with a path, which is a framework that ties together the audience, creatives, and trackers. I explain how in this article. Path building is a remarkably intuitive process, but there are a few moving pieces that need to be managed.
When you finish creating paths on the canvas, they might look like my demo in the screenshot below. Now, you're ready for publishing and reporting, the final section of this guide.
Publishing and reporting
Publishing
Once you finish building a campaign on the canvas, it's time for a review. Triple-check everything, and then check one more time. Done? Cool. It's time to go live.
After you click Review & publish, the platform scans your campaign. If there are validation errors, a window displays a list of problems that you need to fix before you can go live. Once fixed, click Review & publish again.
Reporting
Once the campaign goes live and results start to come in, you'll want to review the data, inspect the campaign's performance, and tweak campaign settings to optimize outcomes. illumin has several reporting options.
Insights
Get a comprehensive view of the journey audience funnel, medium breakdown, segment distribution, and conversion propensity by stage. To open the report, go to the top menu bar and click Insights > Insights. Learn more.
Audience Engagement Map
Quickly view the optimal route or the highest-performing sequence of steps through a journey based on chosen key metrics. Learn more about the audience engagement map.
Predefined Reports
Save time and get the information you need with on-demand templates. Select a report type, enter a couple of configurations, and - bada bing bada boom - illumin delivers ready-to-read or export campaign performance data. Learn how to get informed fast.
Report Builder
Build a custom report from scratch with the metrics you value most. Learn how to build a custom report.
BTW, you can save Predefined and Report Builder reports for later use. If you're a data junkie and need a steady supply of campaign reporting, create a report schedule, and illumin will email the reports to your Inbox on a fixed schedule.
That's all for the Journey Canvas Quickstart guide. If you have any questions, search the knowledge base library or contact illumin support.